C++ 部署#
C++ 部署分为两种方式:
方式 A:直接利用 TVM 源码库构建的文件夹
build/;方式 B:自定义 TVM 运行时打包脚本。
方式 A#
为了便捷,在 TVM 源码库的 apps 下载创建目录 deploy_cpp。
目录组织如下:
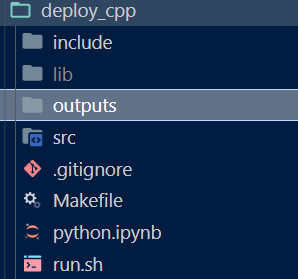
备注
python.ipynb用于编写输出动态库到lib/。src/用于编写 C++ 用例。include/存储一些头文件。outputs/存储一些结果文件,比如 C++ 编译结果。run.sh定义需要处理的任务。Makefile提供 C++ 编译。
下面提供一个简单测试样例:
# 部署 TVM 模块 的 Makefile 样例

IDIR = include
TVM_ROOT=$(shell cd /media/pc/data/lxw/ai/tvm; pwd)
DMLC_CORE=${TVM_ROOT}/3rdparty/dmlc-core

PKG_CXXFLAGS = -std=c++17 -O2 -fPIC\
	-I${TVM_ROOT}/include\
	-I${DMLC_CORE}/include\
	-I${TVM_ROOT}/3rdparty/dlpack/include\
	-I${IDIR}\
	-DDMLC_USE_LOGGING_LIBRARY=\<tvm/runtime/logging.h\>

PKG_LDFLAGS = -L${TVM_ROOT}/build -ldl -pthread # -fPIC

.PHONY: clean all

all: outputs/test_alloc_array

# 使用预构建的 libtvm_runtime.so 进行部署
outputs/test_alloc_array: src/test_alloc_array.cc
	@mkdir -p $(@D)
	$(CXX) $(PKG_CXXFLAGS) -o $@  $^ -ltvm_runtime $(PKG_LDFLAGS)

clean:
	rm -rf outputs
#!/bin/bash
ODIR=outputs # 输出结果
mkdir -p ${ODIR}

# 编译
make

# 配置 C++ 运行环境
export TVM_ROOT=/media/pc/data/lxw/ai/tvm
export LD_LIBRARY_PATH=${TVM_ROOT}/build:${LD_LIBRARY_PATH}
export DYLD_LIBRARY_PATH=${TVM_ROOT}/build:${DYLD_LIBRARY_PATH}

echo "运行样例"
${ODIR}/test_alloc_array
/*!
 * \brief 加载并运行 TVM module.s 的示例代码
 * \file test_alloc_array.cc
 */
#include <dlpack/dlpack.h>
#include <tvm/runtime/registry.h>

void pack_data() {
  // Allocate DLPack 数据结构。分配 nd-array 的内存,包括指定规格的形状空间。
  //
  // 注意,在这个例子中,使用 TVM 运行时 API 来分配 DLTensor。
  // TVM 接受 DLPack 兼容的 DLTensor,
  // 所以只要传递正确的 DLTensor 数组指针,函数就可以被调用。
  //
  // 更多信息请参考 dlpack。
  // 需要注意的一点是,DLPack 包含数据指针的 alignment requirement,而 TVM 利用了这一点。
  // 如果你计划使用你的自定义数据容器,请确保你传入的 DLTensor 符合 alignment requirement。
  //
  DLTensor* x;
  int ndim = 1; // 数组的维数
  int dtype_code = kDLFloat; // dtype 的类型代码
  int dtype_bits = 32; // dtype 的位数
  int dtype_lanes = 1; // dtype 的 lanes 数
  int device_type = kDLCPU; // 设备类型
  int device_id = 0; // 设备 ID
  // The shape of the array, the data content will be copied to out
  const tvm_index_t shape[1] = {10};
  TVMArrayAlloc(shape, ndim, dtype_code, dtype_bits, dtype_lanes, device_type, device_id, &x);
  // 数据加载
  for (int i = 0; i < shape[0]; ++i) {
    static_cast<float*>(x->data)[i] = i;
  }
  LOG(INFO) << "完成验证 DLTensor!";
  TVMArrayFree(x);
}

int main(void) {
  pack_data();
  return 0;
}
方式 B#
同样提供简单测试样例(对方式 A 修改如下):
# 部署 TVM 模块 的 Makefile 样例

IDIR = include
TVM_ROOT=$(shell cd /media/pc/data/lxw/ai/tvm; pwd)
DMLC_CORE=${TVM_ROOT}/3rdparty/dmlc-core

PKG_CXXFLAGS = -std=c++17 -O2 -fPIC\
	-I${TVM_ROOT}/include\
	-I${DMLC_CORE}/include\
	-I${TVM_ROOT}/3rdparty/dlpack/include\
	-I${IDIR}\
	-DDMLC_USE_LOGGING_LIBRARY=\<tvm/runtime/logging.h\>

PKG_LDFLAGS = -ldl -pthread

.PHONY: clean all

all: outputs/test_alloc_array

# 定制 tvm 运行时
outputs/libs/libtvm_runtime_pack.so: src/libtvm_runtime_pack.cc
	@mkdir -p $(@D)
	$(CXX) -c $(PKG_CXXFLAGS) -o $@  $^

# 使用定制的 tvm 运行时进行部署
outputs/test_alloc_array: src/test_alloc_array.cc outputs/libs/libtvm_runtime_pack.so
	@mkdir -p $(@D)
	$(CXX) $(PKG_CXXFLAGS) -o $@  $^ $(PKG_LDFLAGS)

clean:
	rm -rf outputs/*
/*!
 * \brief TVM 运行时打包到一个文件
 *
 *   您只需使用此文件编译 libtvm_runtime 以包含在你的项目。
 *
 *  - 将此文件复制到依赖于 tvm 运行时的项目中。
 *  - 使用 -std=c++17 编译
 *  - 添加以下 include 路径
 *     - /path/to/tvm/include/
 *     - /path/to/tvm/3rdparty/dmlc-core/include/
 *     - /path/to/tvm/3rdparty/dlpack/include/
 *   - 将 -lpthread -ldl 添加到链接库。
 *
 * 这里的包含文件是用相对路径表示的
 * 您需要记住更改它以指向正确的文件。
 *
 * \file tvm_runtime_pack.cc
 */
// const TVM_USE_LIBBACKTRACE = 0 // 替换
#define TVM_USE_LIBBACKTRACE 0
#include "../../../src/runtime/c_runtime_api.cc"
#include "../../../src/runtime/container.cc"
#include "../../../src/runtime/cpu_device_api.cc"
#include "../../../src/runtime/file_utils.cc"
#include "../../../src/runtime/library_module.cc"
#include "../../../src/runtime/logging.cc"
#include "../../../src/runtime/module.cc"
#include "../../../src/runtime/ndarray.cc"
#include "../../../src/runtime/object.cc"
#include "../../../src/runtime/registry.cc"
#include "../../../src/runtime/thread_pool.cc"
#include "../../../src/runtime/threading_backend.cc"
#include "../../../src/runtime/workspace_pool.cc"

// 注意:在此之后的所有文件都是可选模块,
// 你可以包括删除,这取决于你使用多少功能。

// 很可能只需要启用以下其中之一
// 如果使用 Module::Load,则使用 dso_module
// 对于系统打包库,使用 system_lib_module
#include "../../../src/runtime/dso_library.cc"
// #include "../../../src/runtime/system_library.cc"

// Graph executor
#include "../../../src/runtime/graph_executor/graph_executor.cc"
#include "../../../src/runtime/graph_executor/graph_executor_factory.cc"

// Graph Debug
// #include "../../../src/runtime/graph_executor/debug/graph_executor_debug.cc"

// PAPI profiling
// #include "../../../src/runtime/profiling.cc"

// 取消注释以下行以启用 RPC
// #include "../../../src/runtime/rpc/rpc_session.cc"
// #include "../../../src/runtime/rpc/rpc_event_impl.cc"
// #include "../../../src/runtime/rpc/rpc_server_env.cc"

// 这些宏在未注释时启用设备 API。
// #define TVM_CUDA_RUNTIME 1
// #define TVM_METAL_RUNTIME 1
// #define TVM_OPENCL_RUNTIME 1

// 取消注释以下行以启用 Metal
// #include "../../../src/runtime/metal/metal_device_api.mm"
// #include "../../../src/runtime/metal/metal_module.mm"

// 取消注释以下行以启用 CUDA
// #include "../../../src/runtime/cuda/cuda_device_api.cc"
// #include "../../../src/runtime/cuda/cuda_module.cc"

// 取消注释以下行以启用 OpenCL
// #include "../../../src/runtime/opencl/opencl_device_api.cc"
// #include "../../../src/runtime/opencl/opencl_module.cc"

// // VTA
// #include "../../../vta/runtime/device_api.cc"
// #include "../../../vta/runtime/runtime.cc"

// // Fsim driver
// #include "../../../3rdparty/vta-hw/src/sim/sim_driver.cc"
// #include "../../../3rdparty/vta-hw/src/sim/sim_tlpp.cc"
// #include "../../../3rdparty/vta-hw/src/vmem/virtual_memory.cc"
Relay 部署#
也可以加载 Python 端导出的动态库:
/*!
 * \brief 加载并运行 TVM module.s 的示例代码
 * \file deploy_graph.cc
 */
#include <dlpack/dlpack.h>
#include <tvm/runtime/module.h>
#include <tvm/runtime/packed_func.h>
#include <tvm/runtime/registry.h>

tvm::runtime::NDArray graph_executor_output(std::string fname, DLDevice dev) {
  LOG(INFO) << "运行 graph executor";

  // 在库中加载
  tvm::runtime::Module mod_factory = tvm::runtime::Module::LoadFromFile(fname);
  // 创建 graph executor 模块
  tvm::runtime::Module gmod = mod_factory.GetFunction("default")(dev);
  tvm::runtime::PackedFunc set_input = gmod.GetFunction("set_input");
  tvm::runtime::PackedFunc get_output = gmod.GetFunction("get_output");
  tvm::runtime::PackedFunc run = gmod.GetFunction("run");

  // 使用 C++ API
  tvm::runtime::NDArray x = tvm::runtime::NDArray::Empty({2, 2}, DLDataType{kDLFloat, 32, 1}, dev);

  for (int i = 0; i < 2; ++i) {
    for (int j = 0; j < 2; ++j) {
      static_cast<float*>(x->data)[i * 2 + j] = i * 2 + j;
    }
  }

  // 设置正确的 input
  set_input("x", x);

  // 运行代码
  run();
  // 获取 output
  return get_output(0);
}

int main()
{
  DLDevice dev{kDLCPU, 0};
  tvm::runtime::NDArray y = graph_executor_output("lib/test_relay_add.so", dev);
  for (int i = 0; i < 2; ++i) {
    for (int j = 0; j < 2; ++j) {
      ICHECK_EQ(static_cast<float*>(y->data)[i * 2 + j], i * 2 + j + 1);
    }
  }
  return 0;
}